Apple’s Notary Service only accepts binaries signed with the Developer ID certificate. Correspondingly this certificate has direct links to a legal entity or a natural person, forcing them to vouch for the signed binary. In a sense this linkage supplies some security to users as virtually nobody can distribute apps anonymously any longer.
Accordingly Developer ID signed binaries carries the organization’s reputation. For that reason, the certificate—which contains a private key—must be kept safe with limited access to only a few trusted individuals. So that it cannot be mis-used to sign unwarranted products which can compromise the organization’s good name.
In reality, it would make more sense to secure this signing identity into a machine dedicated for signing applications ready to be distributed. For example, a CI/CD system that consumes source code and produces macOS applications. Otherwise you would need a few trusted employees to run the signing processes manually, which in turn probably not the best use of their time and efforts.
Nevertheless Xcode Server (which is a CI/CD system common for building macOS apps) signs built product using the Apple Development certificate by default. To explain, applications signed by this other identity would only run on devices provisioned for development by the same team owning the certificate; not by the general public. But there is no obvious option in an Xcode Bot’s configuration screens to produce Developer ID binaries. To rephrase it, there is no check box nor any menu option for Developer ID signing shown in any of the bot editing screens in Xcode 13.
Then how one get Developer ID signed applications from an Xcode bot?
Read on to find out more.
Basically there are two portions to get Xcode Server to churn out Developer ID signed binaries:
- Upload the Developer ID certificate to the Xcode Server.
- Configure a custom property list in a bot to get it to use the Developer ID signing certificate.
Uploading the Signing Certificate
Follow these steps to configure an Xcode server to be able to sign applications using the Developer ID certificate.
- Open Xcode from your development machine and navigate to the bot’s view.
- Click on the “Edit Bot…” button in the bot’s overview screen.
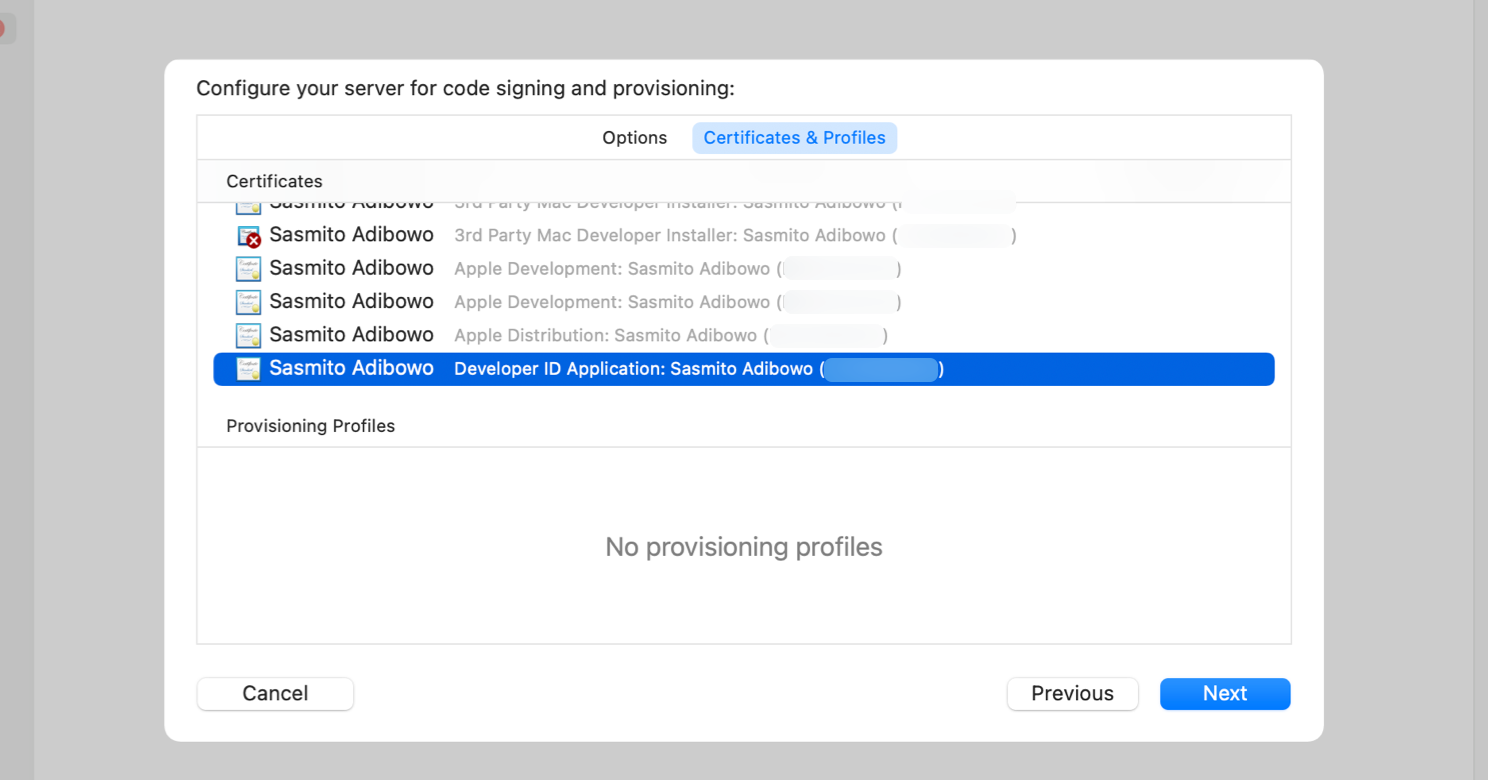
- An Edit Bot dialog should appear. Navigate to its “Signing” tab and then underneath it the “Certificate & Profiles” sub-tab.
- In the “Certificates” list, scroll down to ensure that you have your Developer ID Application certificate added to the server.
- Click on “Add to Server” button next to the certificate entry to upload the certificate if necessary.

You would need to complete the above steps for all Xcode Server instances that would need to produce Developer ID signed binaries. Nevertheless you don’t need to do the above steps for more than one bot. All bots of a server instance would be able to share the certificate.
Configuring Developer ID signing
To begin configuring Developer ID signing in Xcode bots, you would need a configuration file to be configured into them. First copy the following snippet and save it as exportOptions-Developer_ID.plist file.
<?xml version="1.0" encoding="UTF-8"?>
<!DOCTYPE plist PUBLIC "-//Apple//DTD PLIST 1.0//EN" "http://www.apple.com/DTDs/PropertyList-1.0.dtd">
<plist version="1.0">
<dict>
    <key>method</key>
    <string>developer-id</string>
    <key>signingStyle</key>
    <string>automatic</string>
</dict>
</plist>
Afterwards follow these steps to configure a bot to use the installed Developer ID certificate. Correspondingly you would need to do this for each and every Xcode bot that produces macOS applications for general distribution.
- From your Xcode client, navigate to the Xcode Bot screen and edit the bot.
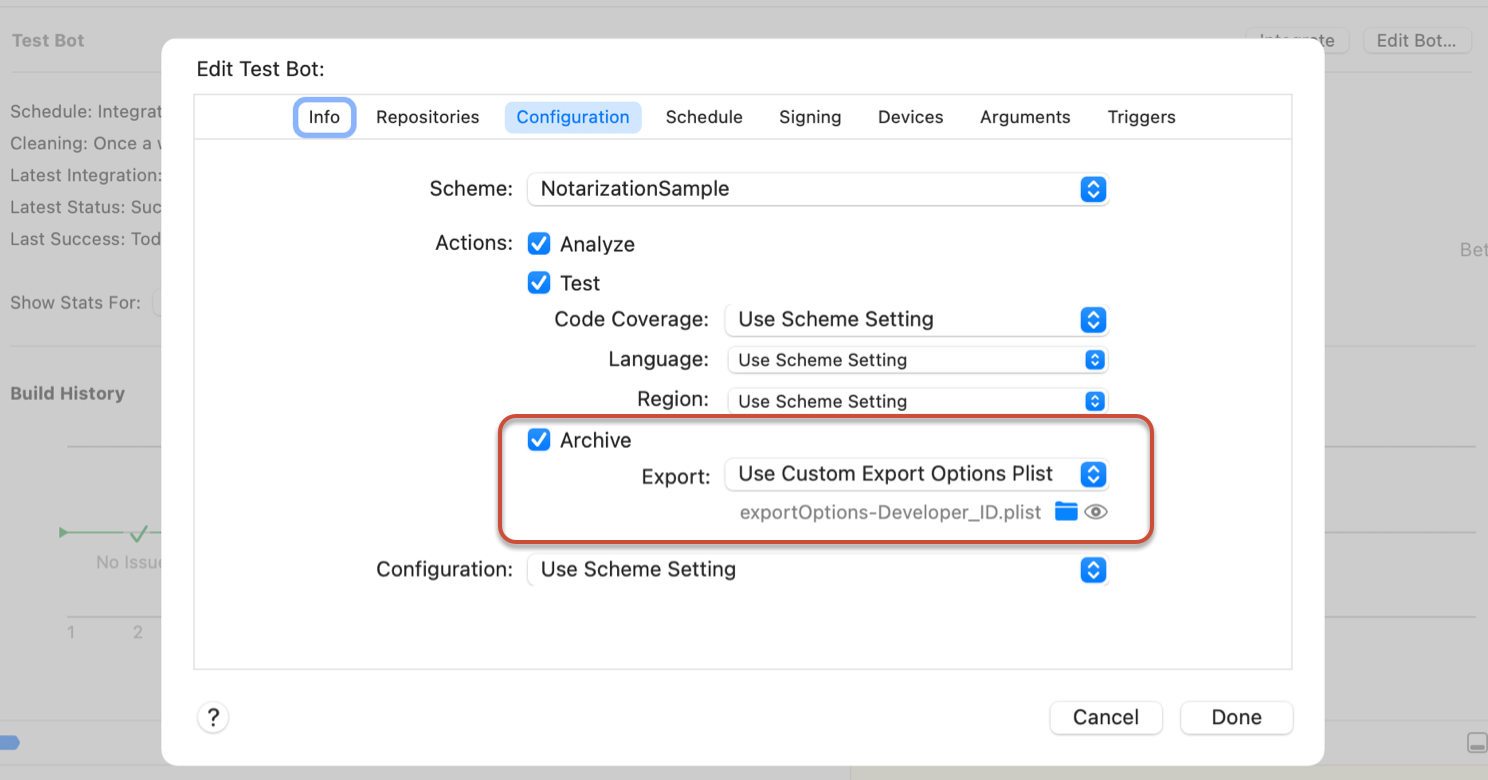
- Navigate to the “Configuration” tab in the dialog.
- Under the “Archive” heading and the “Export:” pop-up button, choose “Use Custom Export Options Plist”.
- You will be prompted to select a file. Choose the
exportOptions-Developer_ID.plistfile that you’ve created earlier.
- Click on the “Done” button to confirm the changes.
- Back in the bot’s overview screen, click on “Integrate” to start a new integration.
- Wait until the integration is completed.
- Download the integration’s Product and then verify that it is signed using the Developer ID certificate using the
xcrun codesign ––vvd App Namecommand. You should see one of theAuthorityline to readDeveloper ID Certification Authority.
Next Steps
Go ahead and implement Developer ID signing into your CI/CD system. Likewise automating signing allows you to limit access to that identity’s private key which would help protect your establishment’s esteem.
Now that you already have Developer ID signing automated, the logical next step would be to automate notarization as well. To reiterate, all macOS software built after 1 June 2019 must be notarized. Similarly macOS since Catalina enforces this and would refuse to launch un-notarized applications.
Of course if you don’t have a CI/CD system yet, you can follow this guide to setup Xcode Server and configure your first bot.

Great content! Keep up the good work!