Testing is an important phase of any software development. Automated testing keeps code in check for all of those edge cases that can’t always be replicated reliably. Unfortunately as macOS developers, we probably don’t test our code enough. One common code is being too lazy to run those tests manually.
But when you reach a certain stage of development, continuous testing becomes critical. However running these tests becomes a chore—unless automated and keeps running in the background without human intervention.
Given these points, this article shows you how to setup Xcode Server for use to support macOS application development and automated tests.
In general these are the steps required to setup a Mac for use to run automated unit and user interface tests for macOS applications.
- Create user account for Xcode.
- Enable Fast User Switching.
- Enable Screen Sharing and Remote Login.
- Setup Xcode Server.
- Create sample test project.
- Setup Xcode bot.
- Test the new Xcode bot.
You perform steps 1–4 on the server whereas steps 5–7 would be best done on the client.
Pre-Requisites
Before you begin, you would need to have these on hand.
- Xcode 13 (Beta 5 as of this writing)
- macOS 12 “Monterey” (also Beta 5)
- A dedicated desktop Mac for the server, running Monterey.
- A dedicated local IP address for the server, preferably on a wired network connection.
- Another Mac for the client, running either Big Sur or Monterey.
Why a desktop Mac? In short it’s because of macOS’ lackluster support for multiple users—more information at the end of this post. Although a MacBook locked to a desk with a wired Ethernet would be a reasonable compromise—as long as the laptop doesn’t get lugged around (or closed in clamshell mode while operating).
To emphasize, if you’re looking to buy a Mac Pro or high-end Mac Mini for dual purpose of Xcode Server and daily development use, stop. You won’t be able to use this machine for anything else besides Xcode Server and maybe file server or other non-interactive uses. Save your (organization’s) money and buy a low-end Mac Mini instead—as long as it can run Monterey. Better yet, buy more than one lowest-end Mac Mini for the budget that you have if your utilization requires it. More details on this near the end of this post.
Create macOS Account
Xcode Server needs its own macOS user account for the purpose of running its integration jobs. Without a doubt this technical user account should be a non-administrative one, otherwise you will risk the server being taken over by a rogue project.
Please follow these steps to create an account for Xcode Server. To explain, you should do this on the mac to be designated as the server.
- Open System Preferences.
- Select “Users & Groups”.
- Click the padlock icon in the bottom left labeled “Click the lock to make changes” and enter the Mac’s administrative account name and password.
- Click on the “+” button in the lower left of the window to bring up a New User dialog.
- Create a new user for Xcode Server to use. Set this as a “Standard” user. For our purposes, let’s name it as “Continuous Integration” and use “ci” as its account name. Together with the robot memoji as the login image to be extra-clear.
Enabling Fast User Switching
Fast User Switching allows you to login to other accounts located in the same Mac without logging out—leaving programs running in the background while someone else uses the computer. Evidently this is an essential feature for running Xcode Server. Chiefly because Xcode Server needs its own user account and you would need to login as that account on every startup.
Follow these steps to enable fast user switching.
- Open System Preferences.
- Select the “Dock & Menu Bar” applet.
- Scroll the left pane down until you see “Fast User Switching”
- Ensure that at least one of the “Fast User Switching” check boxes is enabled—“Show in Menu Bar” or “Show in Control Center”—or even both.
Enabling Screen Sharing and Remote Login
Xcode bot has a feature that lets you monitor UI tests that are currently running. Basically this feature is a button in Xcode to login using Screen Sharing as the Xcode Server user in order to monitor the tests live.
Enabling Remote Login is optional, but would be useful when you require quick command-line access to the server. Essentially you can use the Terminal to ssh into the server and access a private command-line session there.
Follow these steps to enable Screen Sharing and Remote Login in the Server mac.
- Open System Preferences.
- Select the “Sharing” applet.
- Turn on “Screen Sharing”.
- Still in the Screen Sharing section, select the “Allow access for” radio button to “All users”
- Turn on Remote Login.
- Still in the Remote Login section, likewise select the “Allow access for” radio button to “All users”
Setup Xcode Server
Having done the necessary preparation, now it’s time to setup Xcode Server. Equally important, we will test the setup afterwards—which would be outlined in subsequent sections.
Undeniably, the first step is to download Xcode on the server machine. At any rate, the easiest way for this is to download it from the Mac App Store. A point often overlooked, you would need to install Xcode in main drive of the server under the /Applications folder. To clarify, installing Xcode in other locations may prevent its server features from operating properly; despite no apparent detrimental effect when running Xcode interactively.
Having Xcode installed, perform these steps to set it up.
- Login to the server Mac as an administrative user.
- Launch Xcode.
- Open Xcode’s Preferences and navigate to the Server & Bots tab.
- Turn on the switch next to Turn on to provide continuous integration for your team.
- Xcode should prompt you with a “Select Integration User” dialog. Choose the “Continuous Integration” user that you have configured earlier. Then click on Continue.
- Wait until the Xcode Server setup has completed successfully.
- Open System Preferences and select the Security and Privacy applet.
- Select the Privacy tab.
- In the Allow the apps below to control your computer list, enable Xcode Helper. Otherwise UI tests may not be able to run.
- Use Fast User Switching to log in as the Continuous Integration user.
- Click through the initial user setup for the Continuous Integration user. This may include Apple ID login, Siri setup, and Accessibility configuration. By the way, you should not setup an Apple ID for the
ciuser. - Check the menu bar for a Hammer icon. Click on it. Verify that it says “Xcode Server: On” to ensure that Xcode Server is configured correctly.
- Use Fast User Switching again to activate your normal account. Do not log out the
ciuser as Xcode integrations will stop running otherwise.
At this point, Xcode Server should be running. The rest of the setup steps can be done on the client Mac—the one that you use normally for day-to-day development work.
Create a Sample Project
You will need with an example bare bones project to test the Xcode Server setup. To do this, you would need to create a blank macOS application from one of Xcode’s project templates. When you create this project, make sure you include both unit tests and UI tests options from the template. Particularly these tests are needed to validate the Xcode Server setup that you will do.
Having a test project on hand, you should then test it by building and running it locally on your development Mac. Afterwards run all the unit tests and UI tests—also locally. Chiefly this exercise ensures that the project can compile, run, and that you have a working development certificate.
Afterwards you would need to place this project in a shared git repository. You can put it on Github, Gitlab, a local NAS, or even a shared location inside the Mac server itself. As long as the project can be accessed by both yourself and the Xcode bot. Nevertheless setting up a git repository is beyond the scope of this post.
Setup Xcode Client
Xcode Server is mostly controlled by the client—another running instance of Xcode that connects to the faceless server. Correspondingly these clients need to be hooked up with the server to control the latter. What’s more, a given installation of Xcode can control more than one Server and vice-versa.
Follow these steps to configure an instance of Xcode server to a client.
- Login to your development Mac—the mac you use for day-to-day development work.
- Open Xcode’s Preferences.
- In the Accounts section, click the “+” button.
- Select Xcode Server in the Select the type of account you would like to add box. Click on Continue.
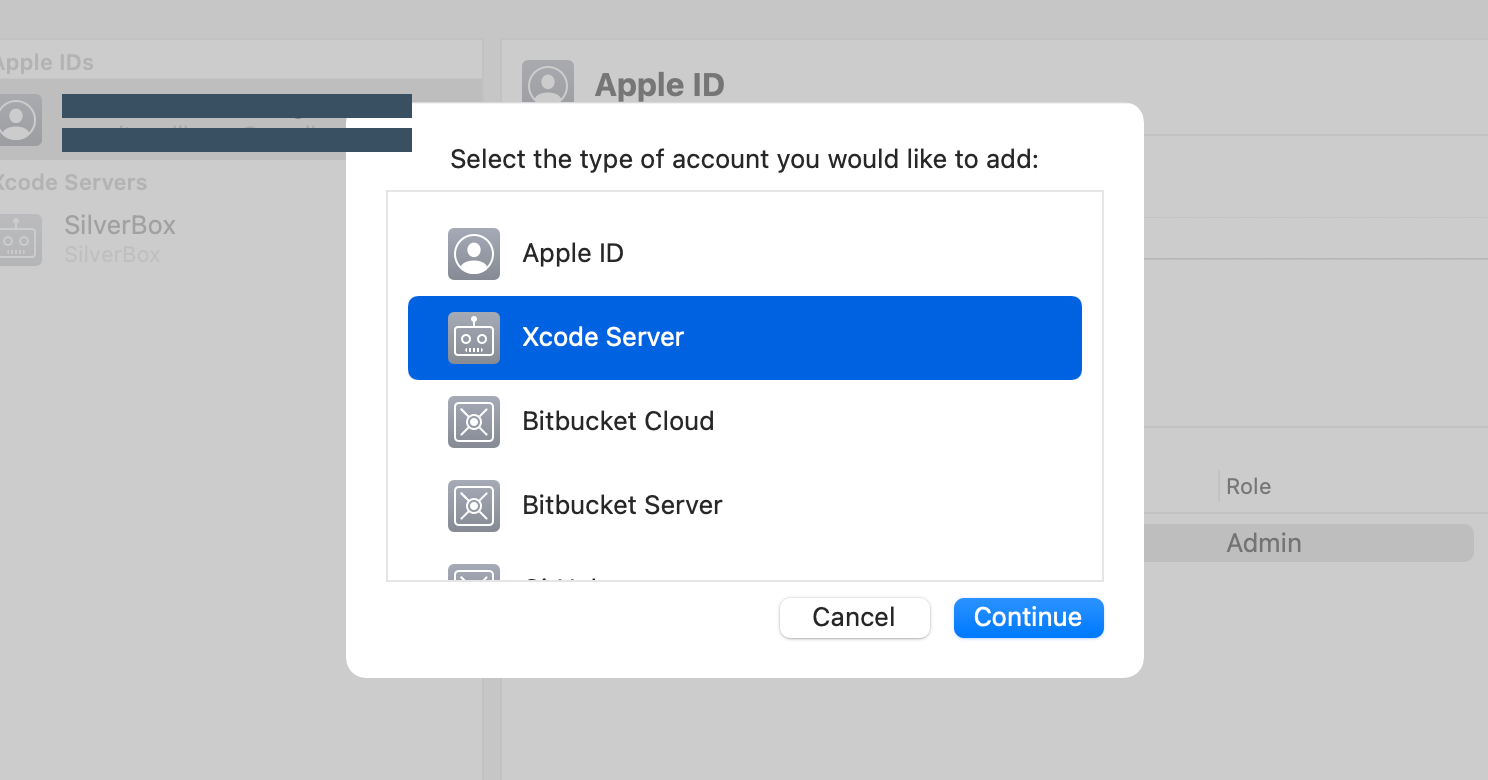
- A “Choose a Server” dialog should appear. Select the machine name of the server that you have setup earlier. Alternatively enter its host name or IP address in the text field below it. Afterwards, click Next to continue.
- There should be a dialog asking for your name and password. Enter your login ID and password of the server (which could be different from the one you use for the local Mac) then click Add.
- You should see the Server added in the list of servers. Close the Xcode Preferences window.
- From Xcode’s menu bar, open View then Navigators then Reports.
- In the left pane, activate the Local tab.
- Verify that the Xcode server machine name is listed there.
Create Xcode Bot
Now it is time to setup your first Xcode bot. This would validate your server setup. Follow these steps to create the bot.
- Open Xcode in your development Mac.
- Open the sample project that you’ve created earlier and pushed into a shared git repository.
- From Xcode’s Product menu, select Create Bot. The Create a new bot dialog should appear.
- Enter a name for the bot. Let’s call this “Test Bot” for our purposes, then click Next.
- The Configure source control for this bot dialog should appear. Click on Sign in and configure the credentials that the bot will use to authenticate itself into the remote
gitrepository. Click on Next when done. - In the Configure build configuration for bot dialog, make sure the Analyze, Test and Archive check boxes are all ticked. Then click Next to continue.
- In the Schedule bot integrations dialog, choose an appropriate configuration. I would specify it to integrate on commit to clean once a week.
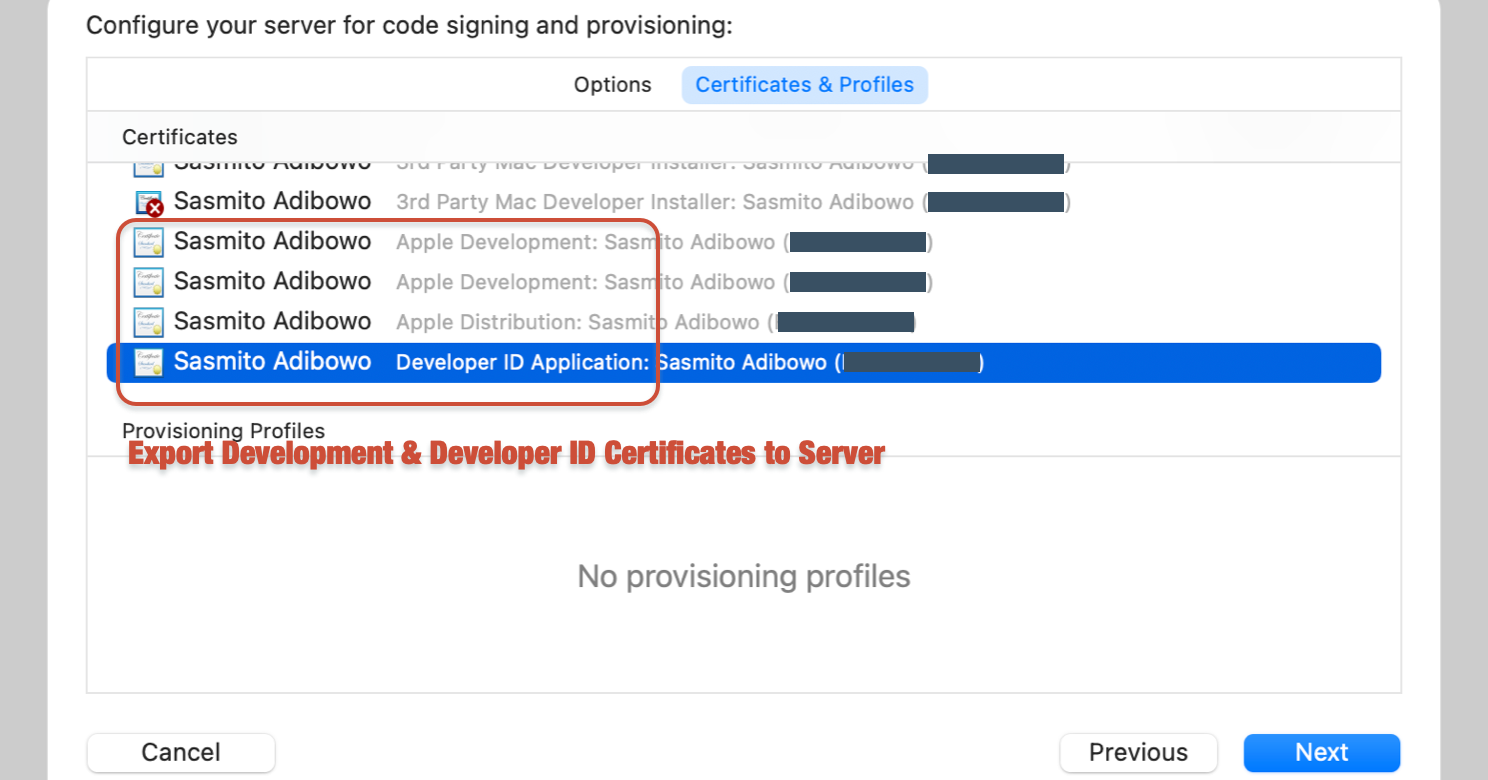
- In the Configure your server for code signing and provisioning dialog, tick both the “Allow Xcode Server to manage my certificates and profiles” and “Automatically register devices in my developer account” check boxes. In the Developer team section, click Add server to team when prompted.
- Still in the same dialog, activate the Certificates & Profiles tab.
- Look for your Development and Developer ID certificates. Click the Add to Server buttons next to each entry to copy it over to the server. Then click Next.
- In the Configure environment variables for bot dialog, leave everything empty for now. Just click Next to continue.
- In the Configure bot triggers dialog, also leave everything empty for the time being.
- Click on the Create button in this final dialog to create the Xcode bot.
- The server may take some time to create your bot. After which you would get a Bot creation succeeded message.
Test Xcode Bot
Now it is time to test the bot. We’ll run integration and make sure it creates a workable app. You should also complete these steps from your development Mac.
- From the Xcode menu bar, open View, point to Navigators then select the Reports menu item.
- Locate your Xcode Server machine name (or IP address) in the left pane, expand it, and select the “Test Bot” that you have created earlier.
- In Xcode’s middle pane, click on the Integrate button.
- Wait until the integration run completed successfully.
- In the bot’s Build Results section, locate the Product heading and click the “Save” button next to it. This should download the resulting app into your local Mac.
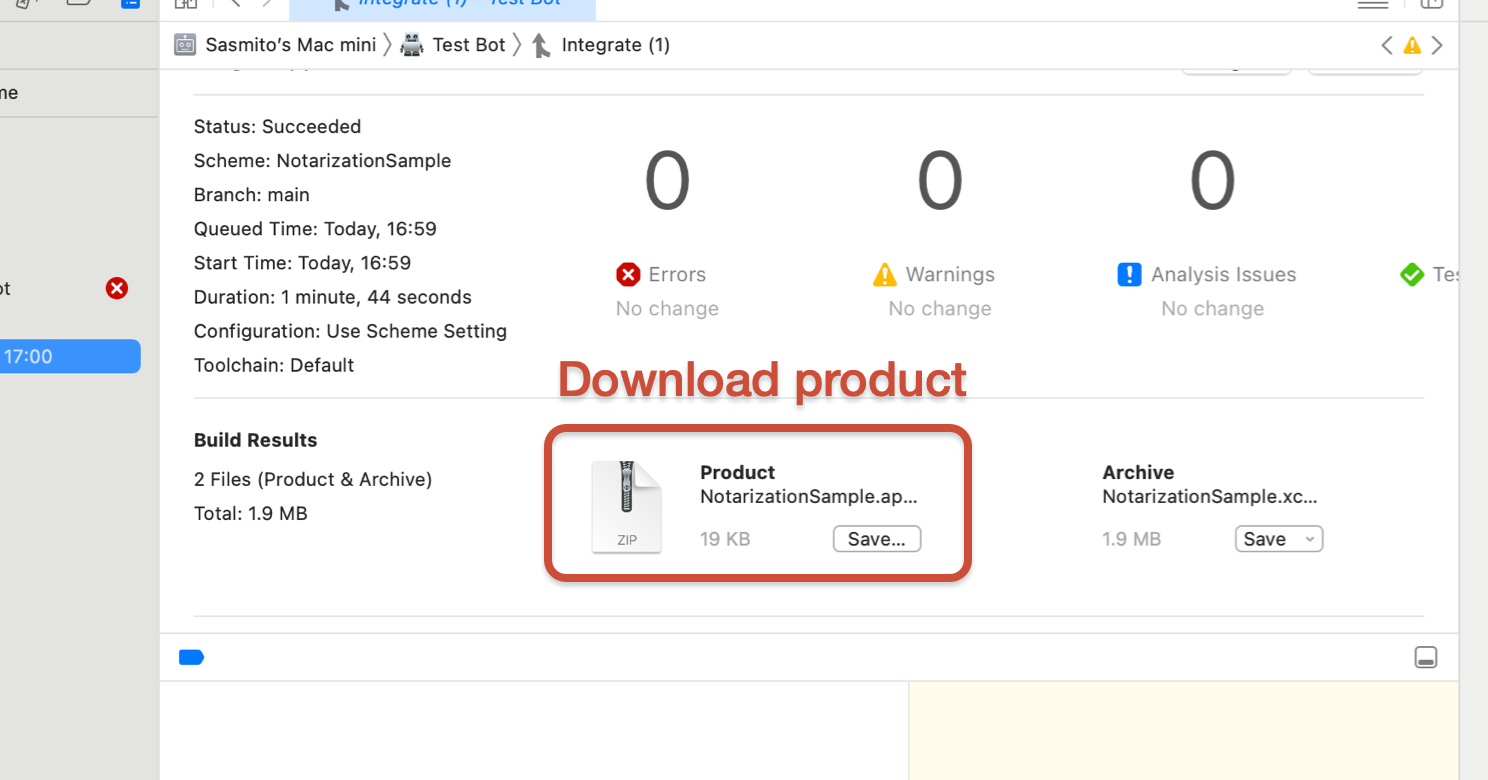
- Double click on the downloaded app and verify that it runs correctly.
Congratulations! You now have your first Xcode bot working.
Why a Dedicated Desktop Mac?
In case you are wondering, why a desktop Mac is required? Why a dedicated one too? Can’t I use my MacBook Pro i9 with 64 GB of RAM for development and have Xcode Server running as a second user in the background?
Undeniably, you can but you won’t want to. There are a good number of shortcomings in both macOS and Xcode which would hinder your productivity if you use a MacBook for both daily work and server purposes.
The following are a few of those issues that I encountered personally.
- A watermark would be placed on your normal user’s screen when Xcode runs UI automations in the background.
- Automated UI tests doesn’t work when the bot user has locked its screen.
- Keychain items of the bot user doesn’t work when that user is in the background.
- IP address changes can cause Xcode bots to be un-editable.
I discovered those issues while running Xcode Server in an M1 Mac Mini. I suspect some issues could be specific to the M1 chip (notably the Keychain problem) since it has file protection schemes that are closer to iOS; but otherwise have not investigate this further.
UI Automation Watermark
When Xcode is running UI tests, macOS would darken the screen and show a watermark on the display saying,
Automation Running
Press ^⌥⌘. to stop
This is called Automation Mode overlay and gets shown to the user logged-in on the physical screen and keyboard. Despite that Xcode UI tests is running on a different user in the background. The screen-photo below shows the automation that is running. To point out, this image has to be a photo since it couldn’t be captured from within the Mac itself.
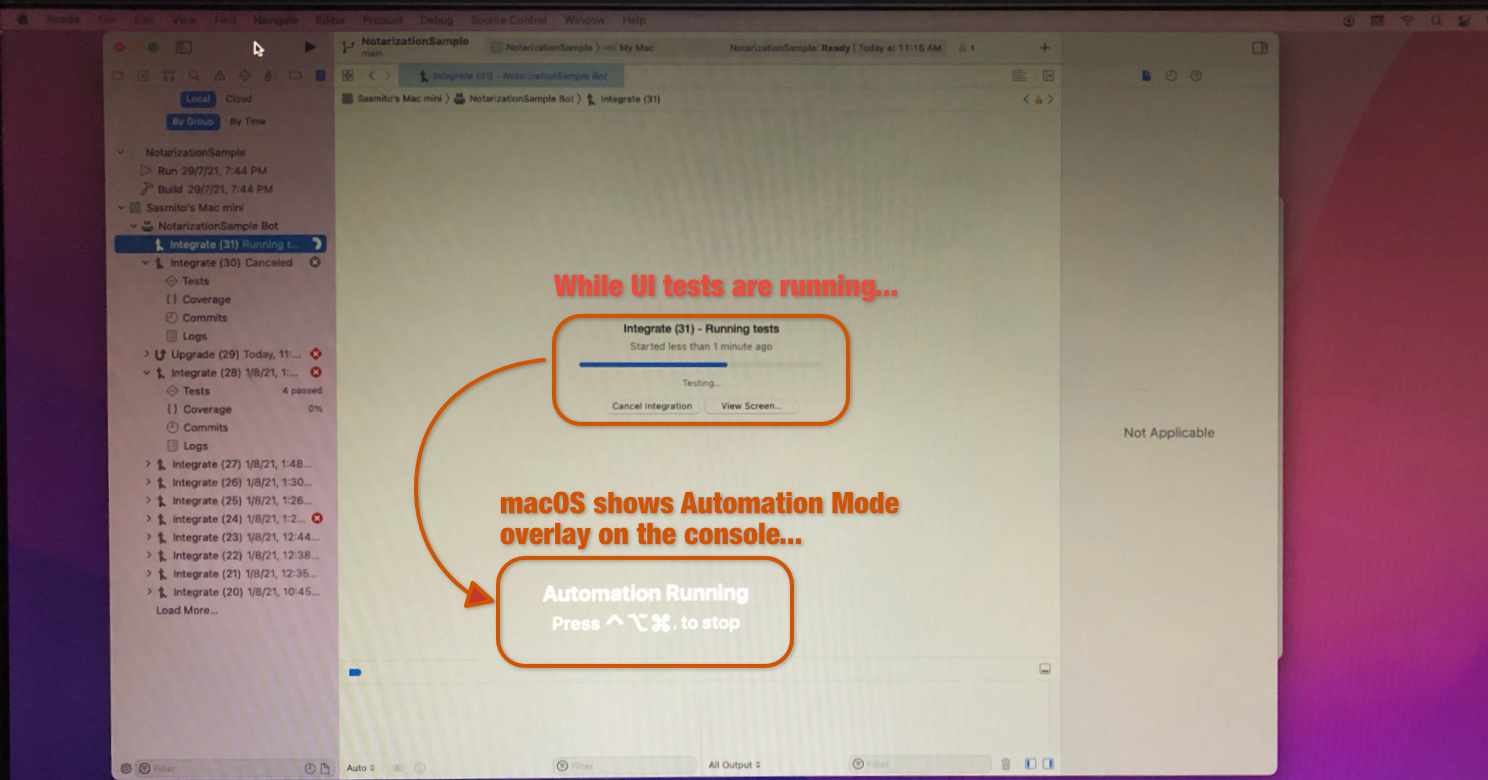
Obviously this automation mode overlay would be very distracting when you are busy with your work. Even though you can click through the UI elements underneath the overlay.
I’ve reported this to Apple as FB9432512 but sadly the company thinks that this is a feature and not a bug. Despite the fact that the overlay makes the Mac unusable to the interactive user.
Here is Apple’s response to my feedback:
The Automation Mode overlay indicates a system-wide state – it is not limited to a single user session. Once automation has been enabled in one user session it is permitted in all user sessions, so the overlay is a security mechanism to ensure automation cannot occur without the user’s knowledge, even if it is practically limited to a different user session such as the background Xcode Server user.
Screen Lock and UI Testing
Another issue that I found with Xcode Server and UI testing is how it handles screen lock. This problem occurs only when both of these conditions are met:
- The server machine is logged in as the Xcode Server user being the interactive user (holding physical screen and keyboard).
- You activate screen lock (Cmd-Ctrl-Q) while logged in as the Xcode server user, such that it prompts for the bot user’s password.
When the console is in that particular state, UI tests will not run. Meanwhile the Xcode bot will fail with an error message similar to the following:
Failed to activate application ‘com.example.SampleApp at /Users/ci/Library/Caches/XCSBuilder/Bots/…/DerivedData/Build/Products/Debug/SampleApp.app' (current state: Running Background)
I’ve reported this to Apple as FB9505050 (what a nice number there), but have not received any response as of this writing.
Keychain Issue
Custom build scripts would likely not have access to the login Keychain. This is likely caused by the keychain being locked when the user is running in a background session (through Fast User Switching). Unfortunately, Xcode bots would most likely run in background sessions.
Say, for example, you’re trying to run notarization as part of Xcode bot runs. If you employ notarytool and have it use a Keychain profile, it would fail with an error message similar to the following:
Error: No Keychain password item found for profile: Notarization-Key
I’ve also reported this to Apple as FB9505064 but have not response to that feedback item.
Bots becoming read-only
There have been instances where Xcode Bot entries would have its “edit” button disabled—preventing you from modifying the bot. Usually these happens when:
- The IP address of the server changes.
- The Xcode installation was upgraded (or maybe down-graded).
Whenever this happens, the only solution is to disable Xcode server and then re-enabling it. Of course this requires the admin to log in to the server, which makes it inconvenient when need to be done frequently.
Which leads to my argument that you would need to configure a non-changing IP address to the server machine. Either configure macOS to have a static IP address or configure DHCP in your router to always hand out the same IP address each time. To this end, both of these methods would be easier to configure and more reliable if the network connection is wired in the first place. Since Apple devices are known to randomize its network hardware address on wireless connections for security purposes.
Next Steps
Don’t wait until Monterey is released. Buy yourself a refurbished low-end Mac Mini (or re-purpose a not-too-old MacBook) and setup Xcode Server there. Start running your tests continuously in the background so that you can confidently ship new code without breaking existing functionalities.

0 thoughts on “How to Setup Xcode 13 Server for macOS Development”