The new M1 “Apple Silicon” Macs are indeed faster than others in their respective classes. They also outperformed a number of higher-classed Mac released just one year ago.
However if you’re depending on command-line applications, things aren’t so pretty. Notably open-source ones. Gnu’s Compiler Collection is yet to support ARM64 on the Mac. Which is impeding support for many numerical libraries based on Fortran such as SciPy. Even Homebrew doesn’t fully support the new instruction set:
Warning: You are running macOS on a arm64 CPU architecture.
We do not provide support for this (yet).
Reinstall Homebrew under Rosetta 2 until we support it.
You will encounter build failures with some formulae.
Please create pull requests instead of asking for help on Homebrew’s GitHub,
Twitter or any other official channels. You are responsible for resolving
any issues you experience while you are running this
unsupported configuration.
Wouldn’t it be great if you can continue using open-source command-line application on your shiny new Apple Silicon Mac? Notably since the first-generation processor is already running Intel-based applications faster than most Mac that came before it?
Yes you can, thanks to Rosetta 2. This is the compatibility layer that allows running Intel-based Mac applications on Apple Silicon. The system is also available for command-line applications, although turning it on would take some work.
The Rosetta Shell
When your command-line application or system hasn’t support the ARM64 instruction set, you’ll need to run it from Terminal sessions in Intel mode. That way, all subsequent command line applications started from the shell would be run under Rosetta 2 – including universal binaries. In other words, when an application has both Intel and Arm variations, the Intel one would be chosen as well as any other child processes of the application.
Here is how you can force the shell to run in Intel mode so that you can continue working in this little command-line Rosetta Island while waiting for native ARM64 support.
- Open the Terminal app.
- Open the Terminal app’s Preferences.
- Click on the Profiles tab.
- Select a profile, click on the ellipsis at the bottom of the profile list and then select Duplicate Profile.
- Click on the new profile and give it a good name. I named mine as “Rosetta Shell”.
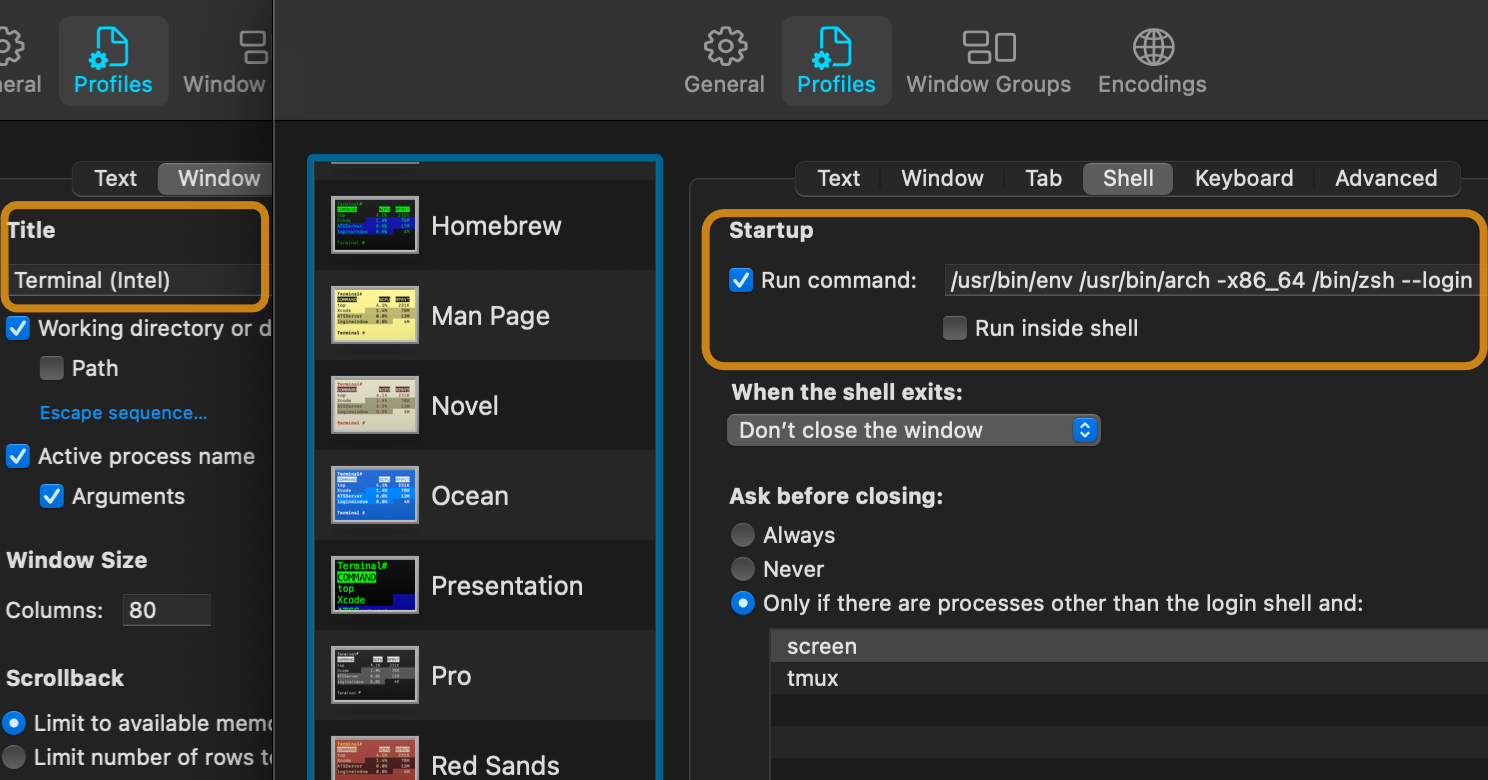
- Also in the new profile, click on the Window tab. In the Title, put a name to indicate that this is for running Intel-based apps. I put “Terminal (Intel)” on mine.
-
Click on the Shell tab and use the following as its Run Command to force the shell run under Rosetta:
env /usr/bin/arch -x86_64 /bin/zsh --login
-
Untick the Run inside shell checkbox. Clearing the checkbox would prevent running the shell twice, which could bloat your environment variables since
~/.zshrcgets run twice. - Optionally set this profile as the Default.
That’s it. The next Terminal window would open the new profile and run command-line applications as Intel binaries.

Installing Homebrew
As of this writing, Homebrew recommends two separate installations for ARM64 systems:
/usr/local/homebrew– For Intel-only packages, which coincidentally the traditional install location./opt/homebrew– To install/run packages that already has Apple Silicon support.
Here is how you can install Homebrew manually on Apple Silicon systems
- Open the Rosetta Shell.
-
Run the following commands:
cd /usr/local
sudo mkdir homebrew
sudo chgrp admin homebrew
sudo chmod g+rwx homebrew
curl -L https://github.com/Homebrew/brew/tarball/master | tar xz --strip 1 -C homebrew
-
Add the following snippet to your
~/.zshrcto automatically choose which Homebrew installation to use depending whether it is running on Rosetta:if [ "$(sysctl -n sysctl.proc_translated)" = "1" ]; then local brew_path="/usr/local/homebrew/bin" else local brew_path="/opt/homebrew/bin" fi export PATH="${brew_path}:${PATH}"
Next Steps
Try this out and see how it goes. Install your favorite Intel-based command-line applications (suggestion: gcc) and see how it performs. Then have a look at Homebrew’s ARM64 compatibility tracking to see how support for the new processor is going.
Hope you don’t mind another question. Lets say I install MV and ANT intel versions of apps and I open the Terminal using the method you describe. When I run my scripts to compile my Java source code for example – does that imply that I need to have installed the Intel JDK or will the Rosetta2 terminal prompt still be able to figure out that the JDK I am using to compile my code with is already Apple Silicon compliant and be able to use that. As you might guess I have not received my new M1 mac yet and I’m trying to collate as much info as possible.
Hi, thanks for the article, it is very helpful.
For the x86 install under Rosetta 2 shell I needed to do this to have files below /usr/local/Cellar:
/bin/bash -c “$(curl -fsSL https://raw.githubusercontent.com/Homebrew/install/HEAD/install.sh)”
then gettext works from the tap.
With the command in your article I ended up with gettext trying to build from source because the cellar path was /usr/local/homebrew/Cellar.